
Laying a concrete slab can seem daunting, but with the right approach, it’s entirely manageable. As a seasoned concrete contractor, I have years of experience with residential and commercial projects, from patios and driveways to pathways and slabs.
This guide will walk you through the process step-by-step, ensuring you achieve a durable and professional finish.
Table of Contents
- Understanding Council Regulations
- Planning and Preparation
- Materials and Tools Required
- Setting Up the Site
- Pouring the Concrete Slab
- Finishing Touches
- Curing the Concrete
1. Understanding Council Regulations
Before starting your project, it is crucial to understand local council regulations. In Geelong, certain projects may require approval, and failing to comply can result in fines or having to redo work. To ensure compliance:
Contact the Local Council:
Visit the council’s website or call them to check if your project requires a permit.Check Zoning Laws:
Some areas may have restrictions on the type or size of structures allowed.Review Building Codes:
Council guidelines may specify slab thickness, drainage requirements, or reinforcement needs.Obtain Necessary Permits:
If approval is required, submit an application and wait for confirmation before proceeding.Confirm Utility Locations:
Contact Dial Before You Dig to locate underground pipes or cables that may be affected by your slab installation.
2. Planning and Preparation
Proper planning is essential for a durable and functional concrete slab. Consider the following:
Determine the Purpose:
A slab for a garden shed will have different requirements compared to a driveway or patio.Select the Correct Thickness:
100mm thickness for footpaths, patios, and garden sheds.
150mm thickness for driveways and carports, especially for heavy vehicles.
Check Ground Conditions:
Ensure the soil is compact and stable to prevent future sinking or cracking.Allow for Drainage:
Plan the slope of the slab to direct water away from structures and prevent pooling.
3. Materials and Tools Required
Gathering the right materials and tools ensures efficiency and quality results:
Materials:
Concrete mix – Calculate the required volume using the formula: Length x Width x Depth.
Gravel – Forms a solid base and improves drainage.
Reinforcement mesh (Reo Mesh) – Provides strength and reduces the risk of cracking.
Formwork timber – Creates the boundary for the slab and ensures an even shape.
Tools:
Shovel – For digging and spreading concrete.
Trowel – For smoothing the surface.
Wheelbarrow – For transporting concrete mix.
Screed – For levelling the poured concrete.
Float – For final surface finishing.
Spirit level – Ensures the slab is even.
Concrete mixer – If mixing manually, a concrete mixer will make the process easier and more consistent.
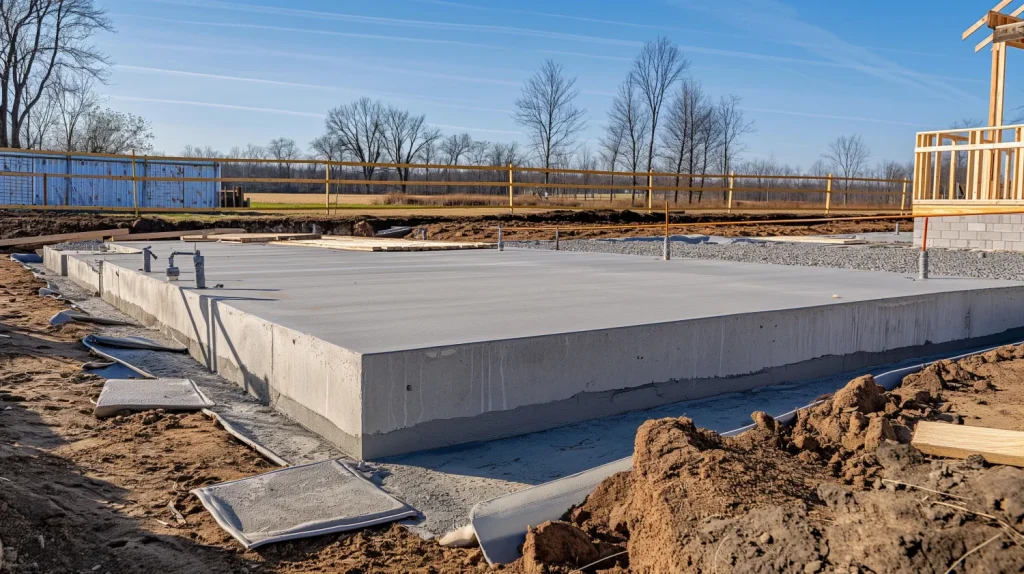
4. Setting Up the Site
Preparing the site correctly will prevent future issues such as cracking or uneven settling:
Clear the Area:
Remove grass, rocks, roots, and any debris that could interfere with the slab.Level the Ground:
Use a shovel and rake to create a flat, stable surface.Lay the Formwork:
Use timber to outline the slab dimensions.
Secure the formwork with stakes to prevent movement.
Ensure the formwork is level and properly aligned.
Add Gravel Base:
Spread a layer of gravel approximately 50-100mm thick.
Compact it with a tamper or plate compactor to create a stable foundation.
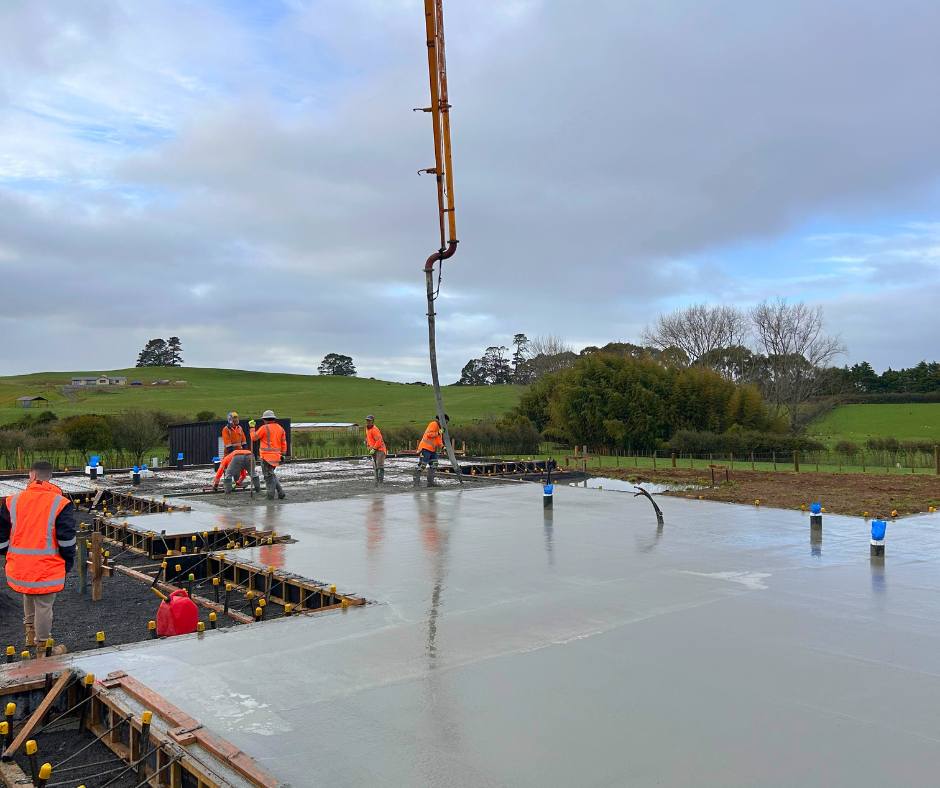
5. Pouring the Concrete Slab
Once the site is prepared, follow these steps to pour the concrete:
Mix the Concrete:
If using pre-mixed concrete, follow the manufacturer’s instructions.
If mixing manually, combine cement, sand, gravel, and water in the correct proportions.
Pour the Concrete:
Start from one corner and work systematically across the slab.
Use a wheelbarrow to transport the concrete for even distribution.
Distribute Evenly:
Spread the concrete using a shovel and screed.
Ensure all corners and edges of the formwork are properly filled.
Level the Surface:
Use a screed board to smooth out excess concrete.
Move the screed back and forth in a sawing motion for an even finish.
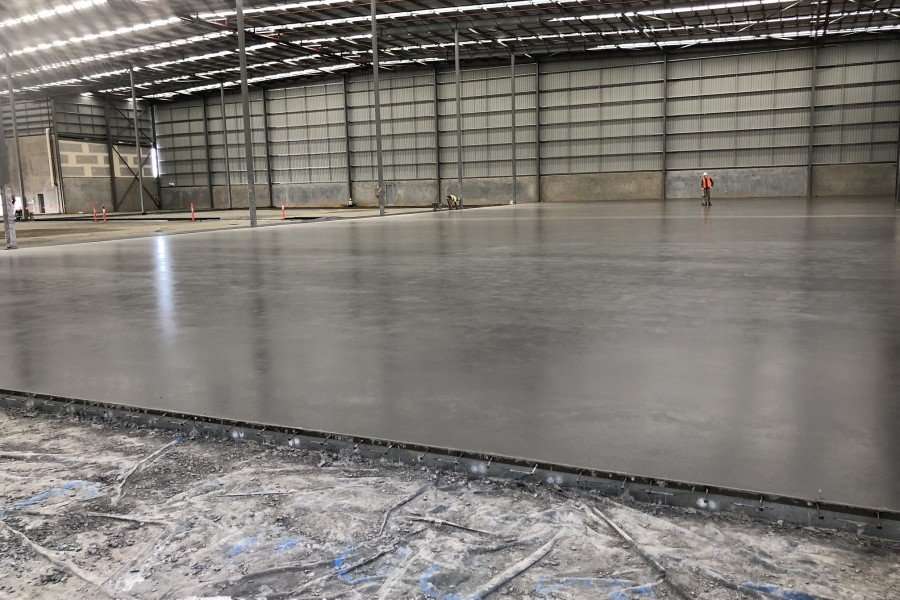
6. Finishing Touches
Once the slab is poured, refining the surface ensures durability and a professional look:
Smooth the Surface:
After the initial setting, use a float to remove imperfections and achieve a smooth finish.
Define the Edges:
Use an edging tool to create clean, rounded edges that prevent chipping.
Create Control Joints:
For larger slabs, cut control joints at regular intervals to minimise cracking.
Use a jointer or saw to make shallow cuts, typically every 1-2 metres.
7. Curing the Concrete
Curing is essential to achieving the full strength of the concrete:
Protect from Moisture Loss:
Cover the slab with a plastic sheet to retain moisture.
Alternatively, apply a curing compound as per manufacturer recommendations.
Keep Moist for Seven Days:
Lightly spray water over the surface daily to slow the drying process.
Avoid Heavy Loads:
Allow the concrete to set for at least 24-48 hours before walking on it.
Wait at least seven days before placing heavy loads or vehicles on the slab.
Why Choose Us
- Expertise: Years of experience in both residential and commercial concrete projects.
- Quality Materials: We use only the best materials to ensure durability and longevity.
- Precision and Care: Attention to detail in every step, from preparation to finishing.
- Compliance: Adherence to local regulations and standards.
- Customer Satisfaction: Commitment to delivering top quality results and meeting client expectations.
For more details or to request a free quote, contact us today. We’re here to help with all your concreting needs in Geelong.
FAQs
The thickness of a concrete slab depends on its intended use, but for standard residential applications like patios, footpaths, and shed bases, a thickness of 100mm is generally recommended. If the slab needs to support heavier loads, such as driveways or structural foundations, it may need to be 150mm or more, with additional reinforcement. It is always a good idea to check local building codes or consult a professional to ensure the right thickness for your specific project.
Whether you need council approval for a concrete slab depends on your local council’s regulations and the size and purpose of the slab. Small slabs for non-structural purposes, such as garden paths or small patios, may not require approval. However, larger slabs, especially those supporting structures like sheds, garages, or extensions, often do require a permit. Checking with your local council before starting your project can save time and prevent potential issues.
The amount of concrete you need is determined by the size and thickness of your slab. To calculate it, multiply the length, width, and depth in metres to get the volume in cubic metres (m³). For example, a 3m x 3m slab at 0.1m thick would require 0.9m³ of concrete. It is always wise to order a little extra to account for variations in the surface and avoid running short during the pour.
Concrete takes about 24 to 48 hours to set enough for light foot traffic, but it continues to cure and gain strength over time. A full cure usually takes around 28 days, at which point it reaches its maximum strength. To ensure proper curing, keep the concrete moist by lightly spraying it with water or covering it with plastic sheeting for the first few days. This helps prevent cracking and ensures a strong, durable finish.
Reo Mesh, short for reinforcement mesh, is a grid of steel bars used to strengthen concrete slabs and improve their durability. It helps distribute weight evenly, reducing the risk of cracking and structural failure, especially in load-bearing applications like driveways and foundations. By reinforcing the concrete, it ensures a longer lifespan and better resistance to movement or ground shifting.
It is not recommended to pour concrete directly onto soil, as the ground can shift, settle, or absorb moisture, leading to cracks and an uneven finish. To create a stable base, it is best to compact the soil and add a layer of crushed rock or gravel, which helps with drainage and prevents movement. A plastic moisture barrier may also be used to reduce water absorption from the ground, ensuring a more durable slab.
To smooth the surface of a concrete slab, start by using a screed board to level the wet concrete, moving it back and forth in a sawing motion. After that, a bull float is used to further smooth and compact the surface, helping to remove any imperfections. Once the concrete starts to firm up but is still workable, a steel trowel can be used for a finer, polished finish. For textured surfaces, such as driveways or footpaths, a broom can be dragged lightly across the surface to add slip resistance.
